利用Hugo+Github Pages搭建个人博客#
转载于:https://www.cnblogs.com/liumylay/articles/17936667.html
转载于:https://www.cnblogs.com/liumylay/articles/17936667.html
转载于:https://www.cnblogs.com/liumylay/articles/17936667.html
创建 GitHub 帐户
安装git,下载对应系统版本 exe ,无脑点击下一步。
安装hugo(extended edition, v0.112.0 or later)
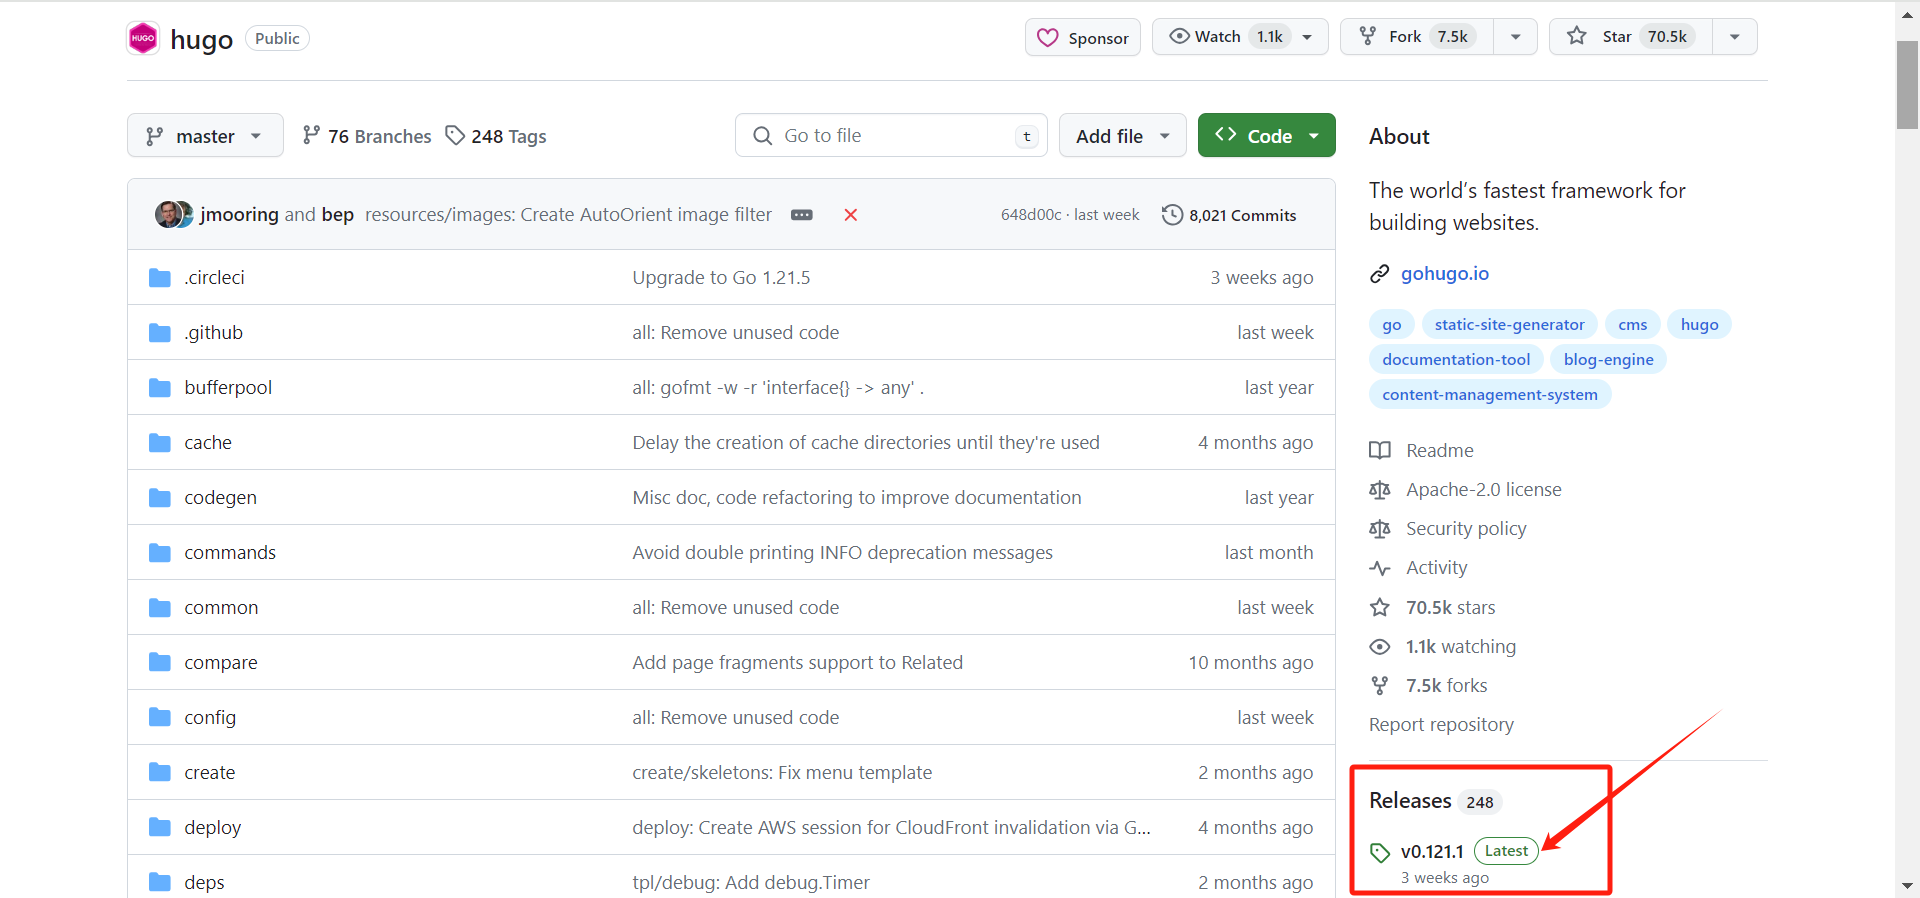
打开 Github 中的 Hugo 库,打开右边侧边栏About下面的 Realeases,下载最新的版本,本次下载为:hugo_extended_0.121.1_windows-amd64.zip
解压后,将其中的 hugo.exe 放到指定的安装目录,比如 D:\softwares\Hugo\bin,然后将该目录添加到系统环境变量(win+R → sysdm.cpl → 高级 → 环境变量 → 系统变量 Path)的 Path 下。
打开命令行,输入 hugo version,显示版本号即为安装成功
在几分钟内利用hugo快速发布自己的个人博客#
快速开始#
使用Git Bash依次输入以下命令,即可建立预览一个PaperMod主题的hugo网站:
1
2
3
4
5
6
| hugo new site myblog
cd myblog
git init
git submodule add --depth=1 https://github.com/adityatelange/hugo-PaperMod.git themes/PaperMod
echo "theme = 'PaperMod'" >> hugo.toml
hugo server
|
通过终端中显示的 URL 查看您的站点。按此按钮Ctrl + C可停止 Hugo 的开发服务器。
命令解释#
在目录中为您的博客创建一个以myblog命名的文件夹目录结构
将当前目录更改为博客的根目录。
在当前目录中初始化一个空的 Git 存储库。
将PaperMod主题克隆到博客目录结构中,并将其作为Git 子模块themes添加到您的博客中。
1
| git submodule add --depth=1 https://github.com/adityatelange/hugo-PaperMod.git themes/PaperMod
|
在博客配置文件hugo.toml(位于根目录)中添加一行,表明为PaperMod主题。
1
| echo "theme = 'PaperMod'" >> hugo.toml
|
启动Hugo的开发服务器来预览博客。
按此按钮Ctrl + C可停止预览博客。
添加内容#
向您的网站添加新页面。
1
2
3
| hugo new posts/文章标题/index.md
# posts为你文章存储的文件夹名,可任取
# 默认生成路径为content/posts/文章
|
为什么使用这个路径来存放文章,见这篇文章链接:https://www.cnblogs.com/liumylay/articles/17936688.html
使用任意文本编辑器打开文件my-first-post.md,可以看到默认内容为:
1
2
3
4
5
| ---
title: "My First Post"
date: 2022-11-20T09:03:20-08:00
draft: true
---
|
请注意draft中的值为true,代表草稿状态。默认情况下,Hugo 在您构建网站时不会发布草稿内容。
1
2
3
4
5
6
7
8
9
| ---
title: "My First Post"
date: 2022-11-20T09:03:20-08:00
draft: true
---
## Introduction
This is **bold** text, and this is *emphasized* text.
Visit the [Hugo](https://gohugo.io) website!
|
保存文件,然后启动Hugo的开发服务器来预览博客。您可以运行以下任一命令来预览草稿内容。
1
2
| hugo server --buildDrafts
hugo server -D
|
通过终端中显示的 URL 查看您的博客。当您继续添加和更改内容时,请保持开发服务器运行。
由于 Hugo 默认开启了热加载功能,所以我们不需要中断已启动的 Hugo 服务,可以在另外一个终端窗口的当前目录下执行其他操作或者修改文章,这些修改后的文章会自动在网页上实时渲染,这样你就可以同步实时观察修改后的网页效果。
配置网站#
使用编辑器打开项目根目录中的博客配置文件 ( hugo.toml)。
1
2
3
4
| baseURL = 'https://example.org/'
languageCode = 'en-us'
title = 'My New Hugo Site'
theme = 'PaperMod'
|
进行以下更改:
- 为您的网站设置
baseURL。该值必须以协议开头并以斜杠结尾,如上所示。 - 设置
languageCode为您的语言和区域(中文简体为zh-CN)。 - 为您的网站设置标题
title。
启动 Hugo 的开发服务器以查看您的更改,请记住包含草稿内容。
发布网站#
在此步骤中,您将发布您的网站,但不会部署它。
当您发布public站点时,Hugo 在项目根目录的目录中创建整个静态站点。这包括 HTML 文件以及图像、CSS 文件和 JavaScript 文件等资产。
当您发布网站时,您通常不希望包含草稿、未来或过期的内容。命令很简单:
在互联网上利用Github Pages部署个人博客#
GitHub 通过 GitHub Pages 服务直接从 GitHub 存储库通过 SSL 为个人、组织或项目页面提供免费、快速的静态托管,并自动化开发工作流程并使用 GitHub Actions 进行构建。
Step1.创建Github存储库。#
注意库名必须以用户名开头,例如:我的用户名是liumy-lay,则库名为liumy-lay.github.io
Step2.将本地存储库推送到 GitHub#
- 报错:由于生成本地
git库的分支默认是master,而github库默认分支为main,因此git push时会出现各种报错 - 解决:将本地分支改名为
main,重新git push会报fatal,根据fatal提示内容强制推送即可解决。
 1
 2
 3
 4
 5
 6
 7
 8
 9
10
11
12
13
14
15
16
17
18
19
20
21
22
| $ git remote add origin git@github.com:liumy-lay/liumy-lay.github.io.git # 将本地git库与远程Github库建立联系
$ git add .
$ git commit -m 'first commit'
$ git push origin main
error: src refspec main does not match any
error: failed to push some refs to 'github.com:liumy-lay/liumy-lay.github.io.git'
$ git branch -M main # 将当前分支改名为main
$ git branch -a # 可以查看当前所有分支,此命令非必要
$ git push origin
fatal: The current branch main has no upstream branch.
To push the current branch and set the remote as upstream, use git push --set-upstream origin main
$ git push --set-upstream origin main --force #强制推送合并分支
Enumerating objects: 32, done.
Counting objects: 100% (32/32), done.
Delta compression using up to 16 threads
Compressing objects: 100% (24/24), done.
Writing objects: 100% (32/32), 49.14 KiB | 137.00 KiB/s, done.
Total 32 (delta 5), reused 0 (delta 0), pack-reused 0
remote: Resolving deltas: 100% (5/5), done.
To github.com:liumy-lay/liumy-lay.github.io.git
+ b899144...23b296b main -> main (forced update)
branch 'main' set up to track 'origin/main'.
|
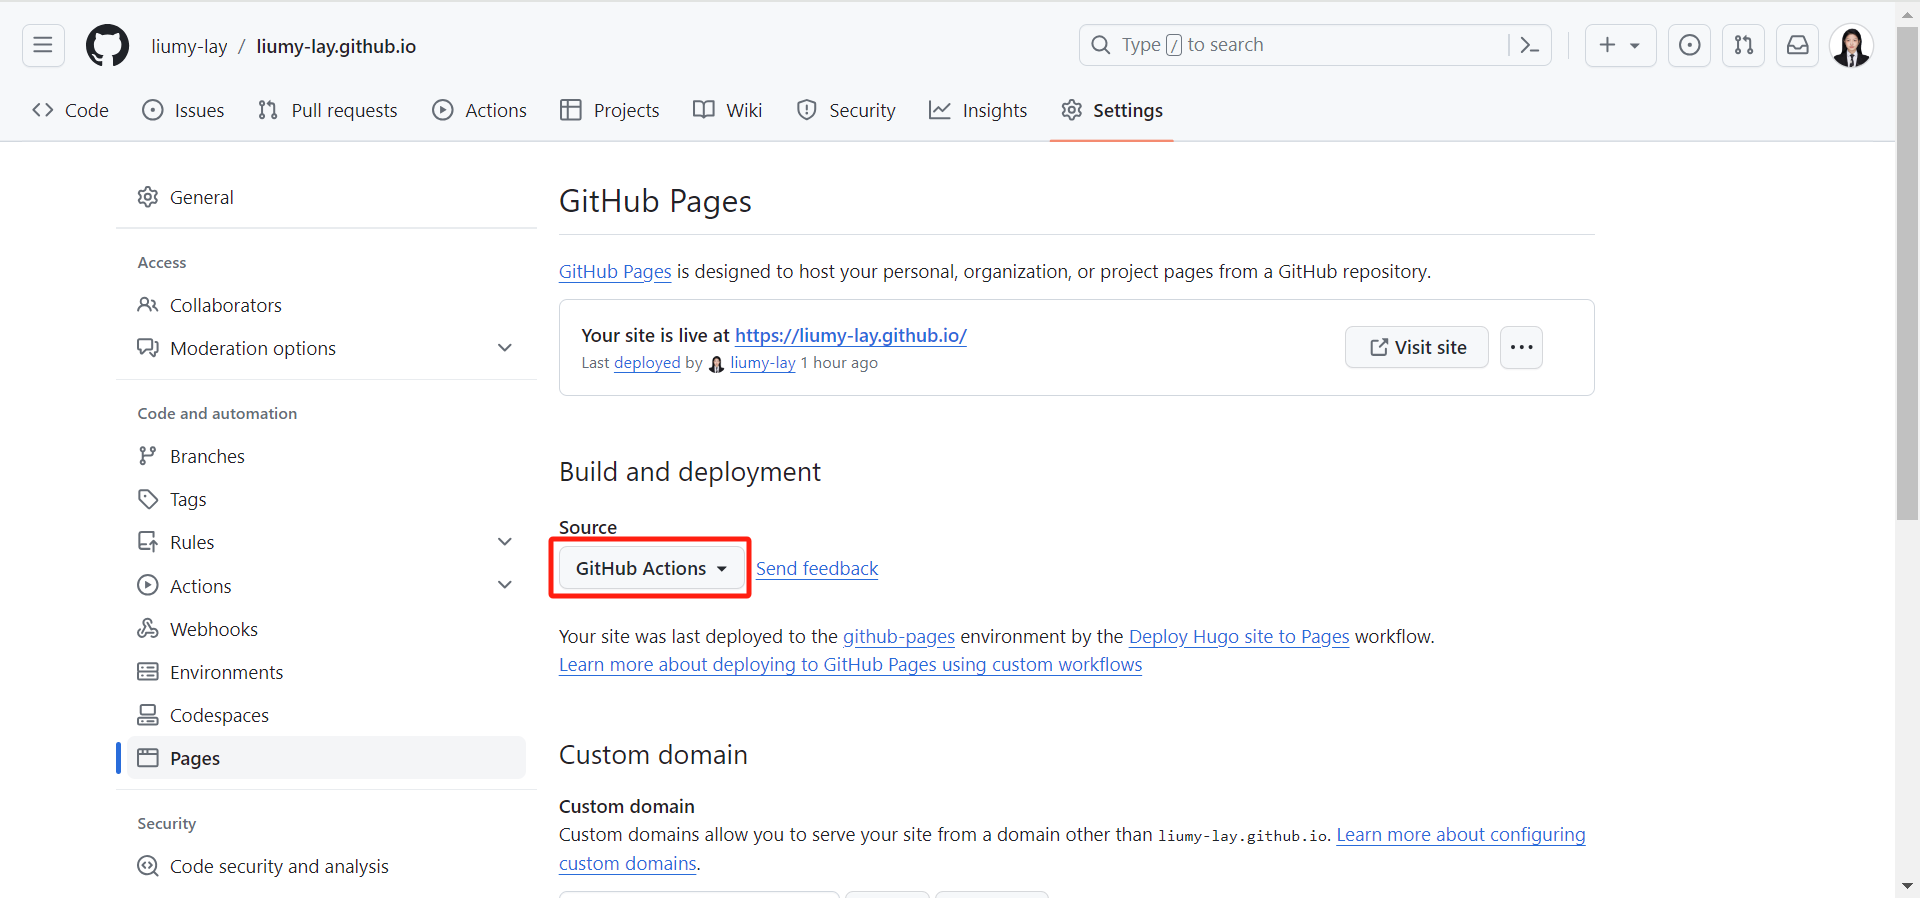
Step3.访问您的 GitHub 存储库,从主菜单中选择设置 > 页面。#
在屏幕中央,将源更改为GitHub Actions。改变是立竿见影的;您不必按“保存”按钮。
Step4.在本地存储库中根目录下创建一个空文件 .github/workflows/hugo.yaml#
Step5.将下面的 YAML 复制并粘贴到您创建的文件中。根据需要更改分支名称和 Hugo 版本。#
 1
 2
 3
 4
 5
 6
 7
 8
 9
10
11
12
13
14
15
16
17
18
19
20
21
22
23
24
25
26
27
28
29
30
31
32
33
34
35
36
37
38
39
40
41
42
43
44
45
46
47
48
49
50
51
52
53
54
55
56
57
58
59
60
61
62
63
64
65
66
67
68
69
70
71
72
73
74
75
76
77
78
| # Sample workflow for building and deploying a Hugo site to GitHub Pages
name: Deploy Hugo site to Pages
on:
# Runs on pushes targeting the default branch
push:
branches:
- main # 分支名称默认为main
# Allows you to run this workflow manually from the Actions tab
workflow_dispatch:
# Sets permissions of the GITHUB_TOKEN to allow deployment to GitHub Pages
permissions:
contents: read
pages: write
id-token: write
# Allow only one concurrent deployment, skipping runs queued between the run in-progress and latest queued.
# However, do NOT cancel in-progress runs as we want to allow these production deployments to complete.
concurrency:
group: "pages"
cancel-in-progress: false
# Default to bash
defaults:
run:
shell: bash
jobs:
# Build job
build:
runs-on: ubuntu-latest
env:
HUGO_VERSION: 0.121.0 # Hugo版本号
steps:
- name: Install Hugo CLI
run: |
wget -O ${{ runner.temp }}/hugo.deb https://github.com/gohugoio/hugo/releases/download/v${HUGO_VERSION}/hugo_extended_${HUGO_VERSION}_linux-amd64.deb \
&& sudo dpkg -i ${{ runner.temp }}/hugo.deb
- name: Install Dart Sass
run: sudo snap install dart-sass
- name: Checkout
uses: actions/checkout@v4
with:
submodules: recursive
fetch-depth: 0
- name: Setup Pages
id: pages
uses: actions/configure-pages@v4
- name: Install Node.js dependencies
run: "[[ -f package-lock.json || -f npm-shrinkwrap.json ]] && npm ci || true"
- name: Build with Hugo
env:
# For maximum backward compatibility with Hugo modules
HUGO_ENVIRONMENT: production
HUGO_ENV: production
run: |
hugo \
--gc \
--minify \
--baseURL "${{ steps.pages.outputs.base_url }}/"
- name: Upload artifact
uses: actions/upload-pages-artifact@v2
with:
path: ./public
# Deployment job
deploy:
environment:
name: github-pages
url: ${{ steps.deployment.outputs.page_url }}
runs-on: ubuntu-latest
needs: build
steps:
- name: Deploy to GitHub Pages
id: deployment
uses: actions/deploy-pages@v3
|
Step6.使用“Add workflows”之类的提交消息将更改提交到本地存储库,然后推送到 GitHub。#
 1
 2
 3
 4
 5
 6
 7
 8
 9
10
11
12
| $ git add .
$ git commit -m 'Add workflows'
$ git push origin
Enumerating objects: 6, done.
Counting objects: 100% (6/6), done.
Delta compression using up to 16 threads
Compressing objects: 100% (3/3), done.
Writing objects: 100% (5/5), 1.32 KiB | 1.32 MiB/s, done.
Total 5 (delta 1), reused 0 (delta 0), pack-reused 0
remote: Resolving deltas: 100% (1/1), completed with 1 local object.
To github.com:liumy-lay/liumy-lay.github.io.git
23b296b..aec5cc1 main -> main
|
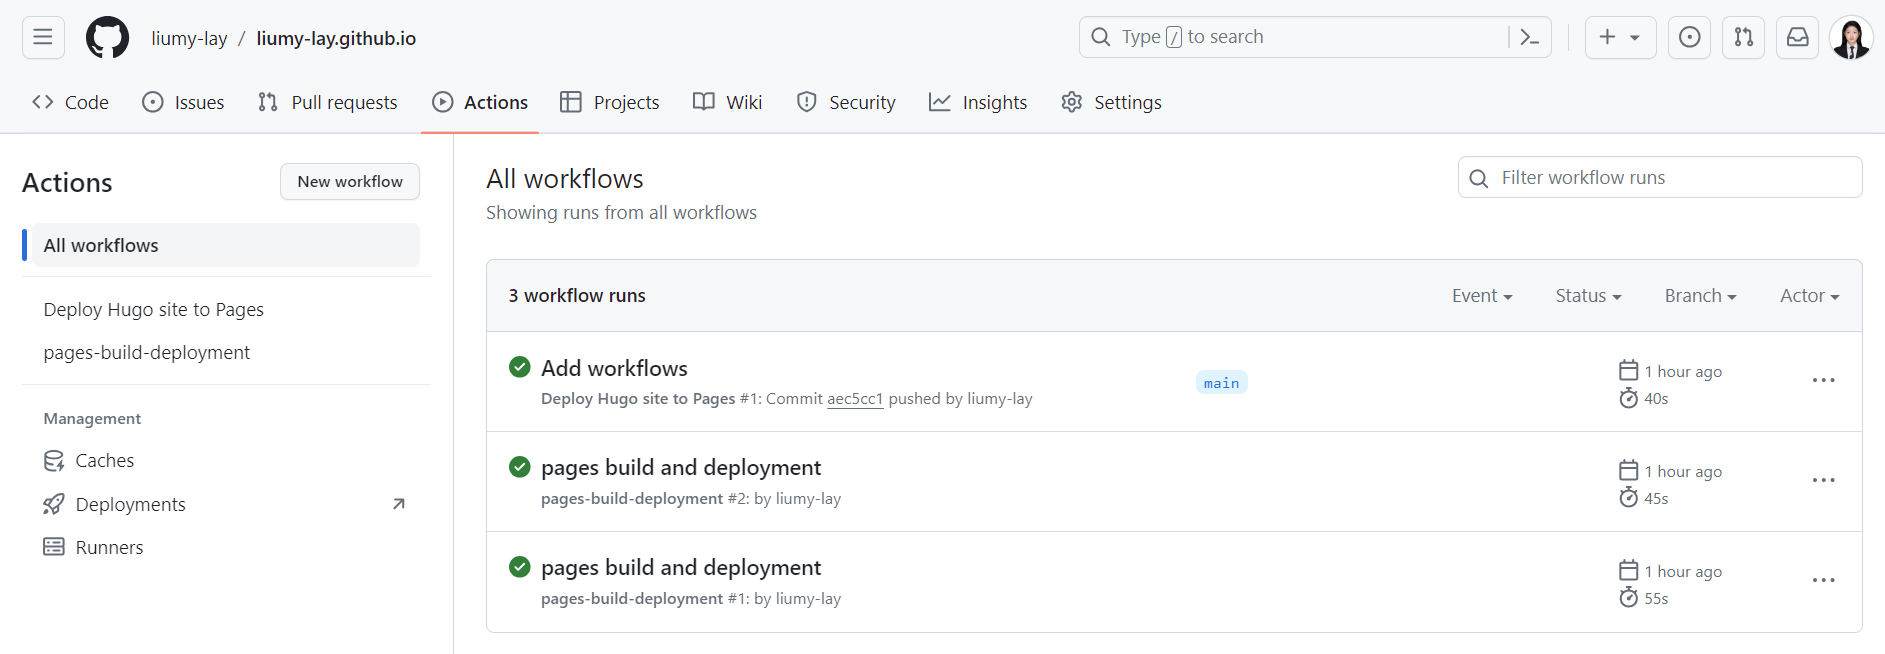
Step7.从 GitHub 的主菜单中,选择Actions。#
当 GitHub 完成站点的构建和部署后,状态指示器的颜色将变为绿色。在部署步骤下,您将看到指向您的实时站点的链接。
将来,每当您从本地存储库推送更改时,GitHub 都会重建您的站点并部署更改。
日常发布文章命令
1
2
3
4
5
6
7
| $ hugo new [posts]/[name]/index.md
$ hugo server -D
$ hugo
$ git status
$ git add .
$ git commit -m '[描述信息]'
$ git push origin
|
参考资料:
https://gohugo.io/getting-started/quick-start/
https://gohugo.io/hosting-and-deployment/hosting-on-github/